

Gather your materials!
– 2 yards pre-washed fabric for DIY toddler nap mat . You want to end up with 2 – 2′ x 6′ pieces. I used Patty Young Knits for Michael Miller in Scandi Chirp which was wider than quilting cotton so I was able to just fold it in half. If you use quilting cotton you may need 4 yards, 2 yards for each side.
It may a little worried about using a knit toddler nap mat for this but it ended up being sewing perfection! You can also use corduroy etc.
– 36″ x 40″ of pre-washed fleece (or similar blanket-like fabric) Both sides will show.
– 9 yards – 1/2″ double fold bias tape.
– Quilt Batting-mid-loft. I used a queen-size that folded nicely to 6 layers of 2’x5′. This seemed to be the max my machine would handle but still enough cushion.
– 2 – 1’x2′ pre-washed muslin or cotton for toddler nap mat pillow insert. (I like to use inexpensive sheets for this.)
– Poly-fill for toddler nap mat pillow stuffing
– 32″ – 1 1/2″ Belting/Webbing. I used cotton but poly would work.
– 3″ – 1″ wide velcro
– Masking tape
- With your blanket fleece vertical, round the top right and bottom right corners.
- Starting on the top left corner of your blanket fleece, start pinning the wider edge of the open bias tape to the fabric with the outside edges aligned. I know my pins are backwards, I’m a lefty. : ) Apply bias tape to the top, right and bottom of the toddler nap mat The left side is left unfinished.
- Sew all the way around the 3 bias taped sides of blanket, just to the outside of the outer crease.
- Fold Bias tape up over edge and (on “back” side) sew through all layers, just inside the edge.
Set blanket aside.
- Lay one layer of your toddler nap mat fabric right-side down. Position the batting on top with left, right and bottom aligned with fabric. It’s ok if your batting is a little larger than your toddler nap mat fabric, but it shouldn’t be smaller. Lay your top fabric on top right-side-up. Your pillow will end up where there is no batting (see below.) Make sure your toddler nap mat fabric pattern is facing the correct way, top and bottom.
- Pin through all layers, all the way around edge.
- Measure 8″ from the bottom on left and right side and mark at the very edge.
- Using a ruler, tape from one mark straight across to the other side.
- Now for the true test of your sewing machine. Sew a straight stitch along the edge of the tape at your marks. I used my machines longest stitch (5). I won’t lie, this was pretty cumbersome and my toddler nap mat fabric pinched a few times but the knit fabric and the busy pattern were so forgiving that I just went with it.
- Now measure 5″ up each side from the line you just sewed, mark, tape and sew. Repeat as many times as needed to get approximately 10-12″ from the top, or end just before you hit the end of your batting. If you need to make your last row a bit shorter or taller, no one will notice.
Tip: When you get a few rows in, the amount of toddler nap mat fabric that needs to fit under the arm of your sewing machine is cumbersome. I rolled it up tightly as shown below and it helped immensely.
- Now you are left with 2 flaps of toddler nap mat fabric at the top. (Ignore that my fabric pattern is upside-down. I’m a pregnant dummy. Your fabric pattern should be right-side-up.) Measure the height and width of the flaps from left to right and top to bottom(the first stitched line.) Mine was 24″ wide by 11″ tall. Add 1/2″ to both measurements.
- Now we are going to make a really down-n-dirty pillow insert. Cut 2 rectangles of basic muslin to the size above, so mine was 24.5″ x 11.5″. Pin together.
-
Sew all the way around with 1/4″ seam, leaving an opening for turning and stuffing. Snip your corners.
Turn inside out and stuff firmly. Pin your opening (you can turn it in and make a neat closure but it will be completely hidden so it doesn’t really matter.) - Sew opening closed.
Set pillow insert aside.
- Now is a good time to trim up the stuffing even with the toddler nap mat fabric edge.
Now we are going to add a shoulder strap.
- Cut a length of webbing/belting the width of your t toddler nap mat . 24″ in my case.
- Finish the raw ends of your webbing by stitching a tight zig-zag along each end of the strap with one side of the stitch hitting over the edge of the toddler nap mat fabric. Or an overlock stitch.
- Decide which side is the outside of your toddler nap mat . It won’t really matter unless you have just realized that one side of yourtoddler nap matfabric is upside-down. Measure 15 inches up from bottom and pin strap to the very edge on both sides.
- Through all layers, sew a square with an x in the middle, a typical reinforced strap stitch (is there a technical term for this?) Add a few backward stitches at the beginning and end to secure.
- Starting on the front of the toddler nap mat , begin pinning the bias tape just before the top left corner. The opening right below the start of the bias tape will be where you insert the pillow later.
You want to add a little tuck like this at the beginning.
- Continue to pin along top, down right side and across bottom. Again, my pins point out because I’m a lefty.
- For the corners, just turn the bias tape, leaving a rounded corner, you will trim the excess fabric later.
-
Just after you turn the bottom left corner, you want to add your blanket. Align the left (unfinished) edge of your blanket with the left side of yourtoddler nap The top of the blanket should hit just under the pillow pocket and the bottom edge of the blanket should be at least a few inches above the bottom edge of the toddler nap mat . The blanket will be much wider than the toddler nap mat .
Note: You can also see when I had to add a new strip of bias tape along the bottom edge. I used a french seam “fold” to “hook” the ends into each other. This is a picture from later in the project, don’t be confused by the lack of pins and the trimmed corner. - Continue pinning the bias tape until you hit opening for the the pillow. Insert pillow.
Continue pinning bias tape, closing pillow area. When you reach the start of the bias tape. “Hook” ends of bias tape into each other with another French seam “fold.”
- Start sewing the bias tape. Keep checking that you have all of your layers aligned and that you are sewing through them all. You want to sew just outside the outer fold of the bias tape. Sew all the way around edge.
It will look like this, except your stitches wont be all wonky. Check under the bias tape all the way around and make sure you didn’t miss the fabric anywhere. If you did, just sew over that section a little deeper into the bias tape.
Trim any edges even with the outer edge of the bias tape.
Now wrap the bias tape around the edge of your toddler nap mat . You can pin if you like but I found it easier not to pin so that I could keep checking that all layers were being sewn in.Ideally you want to keep your bias tape flat and stitch through all layers but you might have to be flexible here and let the folds open a little to accommodate the girth of the edge. It is MORE important that all layers get securely sewn into the bias tape then keeping the bias tape flat.
You are seriously almost done! Your toddler nap mat will look something like this rolled up. We just need to add Velcro closures.
Cut 2 – 4″ lengths of webbing/belting. Finish ends the same as the strap above.
Sew 1 1/2″ of Velcro (fuzzy loops) to under side of strap as shown. Repeat for 2nd strap.
Pin other end of strap (5″ in from side and 2″ in from bottom) at the bottom of your toddler nap mat . Repeat on other side.
Roll toddler nap mat and position other side of Velcro (scratchy hooks) on mat and pin.
Sew straps to toddler nap mat using the same formation as the shoulder strap. For the other side, I hand-sewed them to the toddler nap mat, going through only the top layer, using many small tight stitches.
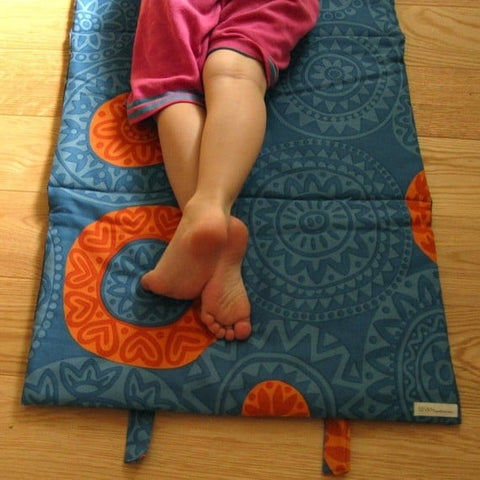
And you are done with your DIY toddler nap mat ! Snuggle up my friend! I think I will add a cute applique to the blanket, maybe pick up one of the sweet shapes from the fabric or do her name so none of those 3 year old hoodlums walks off with my masterpiece!